IBM Lotus Client Configuration and troubleshoot
This article will show you how to configure IBM Lotus Notes to download e-mail from your Google Gmail account.
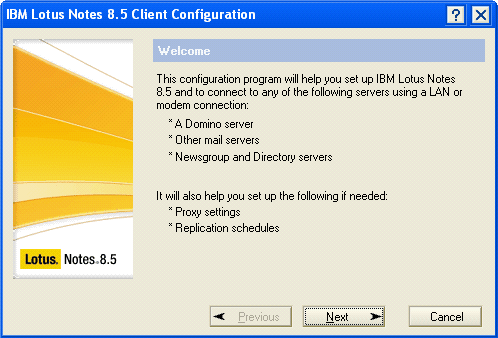
Launch the Lotus Notes Client after installing it:
 |
| IBM Lotus notes client configuration Step 1 |
- Enter your name
- Uncheck "I want to connect to a Domino Server
- Click Next
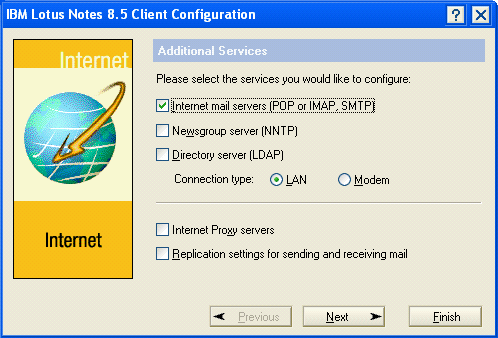 |
| IBM Lotus notes client configuration step 2 |
- Check "Internet mail serves (POP or IMAP, SMTP)
- Click Next
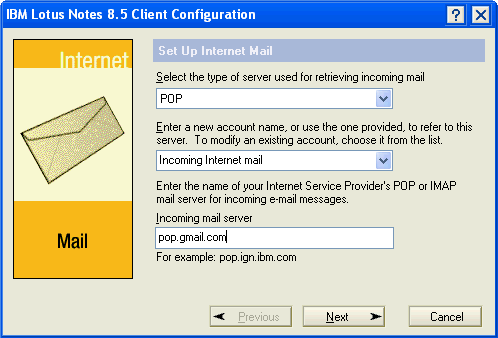 |
| IBM Lotus notes client configuration step 3 |
- Enter Gmail incoming mail server "pop.gmail.com"
- Click Next
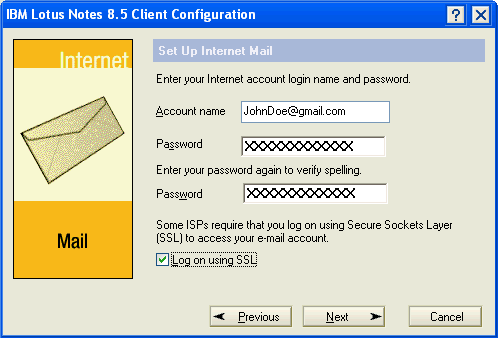 |
| IBM Lotus notes client configuration step 4 |
- Enter your email address in the Account name field
- Enter your Password
- Check Log on using SSL
- Click Next
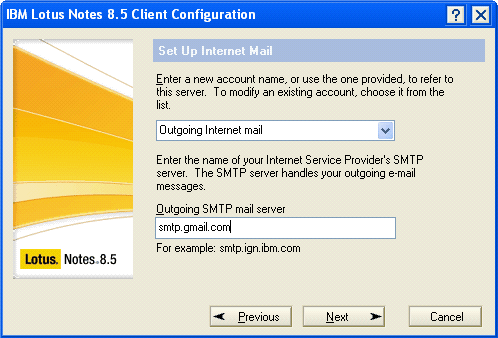 |
| IBM Lotus notes client configuration step 5 |
- Enter Gmail outgoing mail server "smtp.gmail.com"
- Click Next
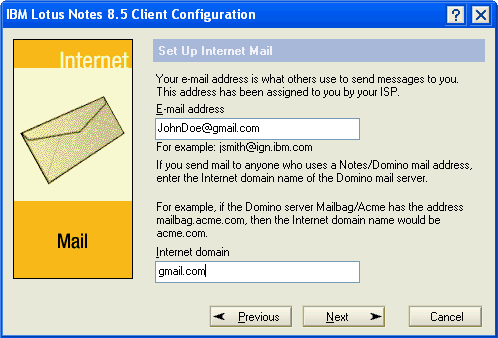 |
| IBM Lotus notes client configuration step 6 |
- Enter your Gmail e-mail address
- Enter Gmail in the Internet Domain
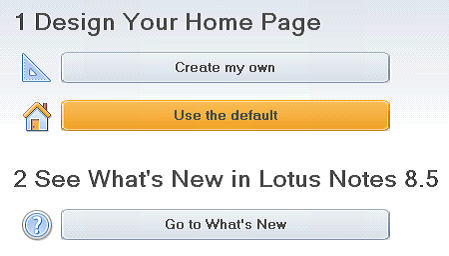
- Click Next then the Client should start.
Select Use the Default
 |
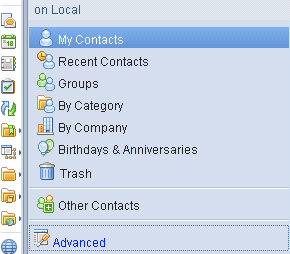
| IBM Lotus notes client configuration step 7 |
- Open Contacts
- Select Advanced
 |
| IBM Lotus notes client configuration step 8 |
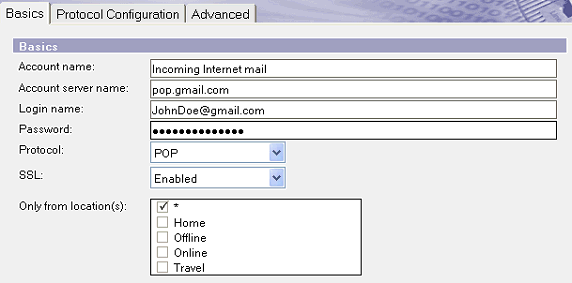
Select Accounts:
Select Incoming Internet mail
Basics tab:
- Account name: Incoming Internet mail (By Default)
- Account server: pop.gmail.com
- Login Name: Your gmail email address (complete with the @gmail.com)
- Password: Your password
- Protocol: POP
- SSL: Enabled
Protocol Configuration tab: can be left as is or changed
 |
| IBM Lotus notes client configuration step 9 |
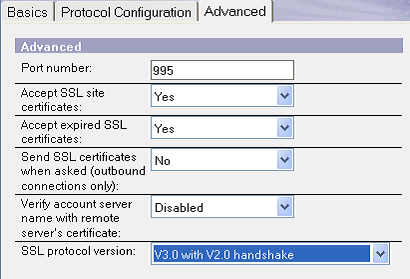
Advanced Tab:
- Port Number: 995
- Accept SSL site certificates: Yes
- Accept expired SSL certificates: Yes
- Send SSL certificates when asked (outbound connections only): No.
- Verify account server name with remote server's certificate: Disabled
- SSL protocol version: V3.0 with V2.0 handshake
 |
| IBM Lotus notes client configuration step 10 |
Save & Close.
 |
| IBM Lotus notes client configuration step 11 |
- Select Outgoing Internet mail
- Open it
- Select Edit
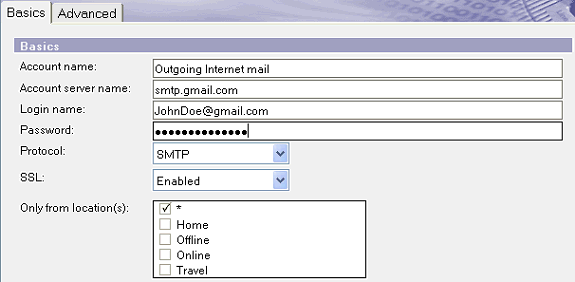
Basics Tab:
- Account Name: Outgoing Internet mail (By Default)
- Account server name: smtp.gmail.com
- Login Name: Your gmail email address (complete with the @gmail.com)
- Password: Your password
- Protocol: SMTP
- SSL: Enabled
 |
| IBM Lotus notes client configuration step 12 |
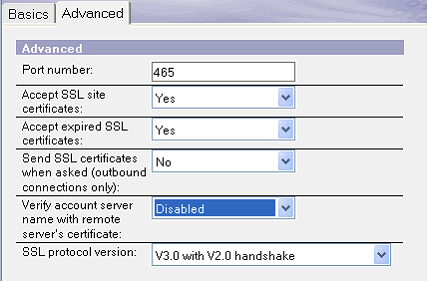
Advanced Tab:
- Port Number: 465
- Accept SSL site certificates: Yes
- Accept expired SSL certificates: Yes
- Send SSL certificates when asked (outbound connections only): No.
- Verify account server name with remote server's certificate: Disabled
- SSL protocol version: V3.0 with V2.0 handshake
 |
| IBM Lotus notes client configuration step 13 |
Save & Close.
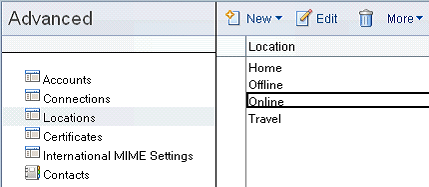
- Select Locations
- Select Online > Open
 |
| IBM Lotus notes client configuration step 14 |
Basics Tab:
- Location Type: Local Area Network
- Location Name: Online (By Default)
- Internet Mail Address: Your gmail email address
Leave the rest as it is.
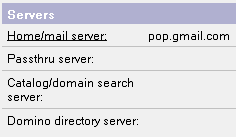
Servers Tab:
- Home/Mail server: pop.gmail.com
Leave the rest as it is.
 |
| IBM Lotus notes client configuration step 15 |
Ports tab:
No changes (ensure TCPIP is checked)
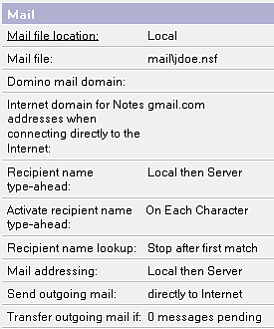
Mail Tab:
- Mail file location: Local
- Internet domain for Notes addresses when connecting directly to the Internet: gmail.com
- Send Outgoing mail: directly to Internet
Leave the rest of the fields as it is.
 |
| IBM Lotus notes client configuration step 16 |
Save & Close.
- Open the replication page
- Make sure that only the following below are checked:
 |
| IBM Lotus notes client configuration step 17 |
Restart the client.
 |
| IBM Lotus notes client configuration step 18 |


.jpg)
.jpg)


.jpg)


-compressed.jpg)

0 Comments